kanzashi flower
You will need :
- 16 squares of fabric measuring 2 1/2" x 2 1/2" ( you can have them in any other sizes)
- Starch ( I used tapioca starch)
- Straight Pins
- Needle and Thread
- Scissors
Method :
- Cut and starch your 2 1/2" x 2 1/2" squares. The size of your squares will determine how big your flower will be. You can made the flower with any amount of petals (5,6,7,8 or even more). In this tutorial I am making 8 petals. (However I am layering the petals, so I need 8 squares)

- Fold the bottom corner up to meet the opposite corner. Make sure that the wrong sides are folded to the inside so that the right sides will appear on the outside.

- Now fold up the long side like below.

- Flip the fabric over and fold the outside corners into the center like below.

- Flip the fabric over and fold the 2 corners to the middle like this.

- Fold in half making sure the folded points you just folded in the previous step are now on the inside

- This is how the petal will look.

- Stick a straight pin in the middle of the petal to keep it secure

- Repeat the above process for all the squares.

- To have double layer petal, stack 2 petals together and stick the straight pin to secure them

- Trim off the raw edges to have a flat edge (just like below)

- String all of the petals together on a needle with thread that has been doubled and knotted at the end.

- Pull the string of petals together to form a circle. Sew the petals to each other on the underside. To finish off embellish the middle with a button or even a yo-yo.

Kanzashi flower can be used to embellish many craft projects like, headbands, handbags, hats, blouse etc.
kanzashi totural
Kanzashi Tutorial:

Begin with a square of 3" fabric. I recommend starching and ironing your fabric before, as it will be easier to work with and leave you with a neater finished product.

Fold this square in half diagonally. Hold the triangle with the open end pointing up.

Fold the bottom left corner up to the center peak.

Then fold the bottom right corner up to the center.

Flip your fabric over and fold the outer corner in (left and right) so that they meet in the center.

Fold your fabric in half.

The folded corners should be tucked in.

Pinch the folded fabric together. Put a pin through the petal, making sure to go through the smaller triangles, to secure it.

Clean up each petal by trimming off the base. To do this, just cut straight across the bottom fold.

Repeat with all of your 3" squares.

Now that your petals are clean and ready to go, thread your needle. I like to double up on the amount of thread for more reinforcement.

Pull the threaded needle through the first petal near the base.

Do not knot your thread at the end. Instead, leave about 5 inches to work with later. Thread all the petals in the same spot.

Cut the needle off and leave enough thread to create your knot. Loop the two ends of thread together to create a surgeon’s knot.

Tighten the knot to bring the petals closer together. Once the flowers are evenly arranged, double-knot your thread. Cut the remaining lengths of thread. Press your flower down gently with your fingers to straighten any crooked petals.

Pucker the ends of the petals with your fingers so that they open nicely. This step is optional. If you prefer straighter petals, then skip this step. Pushing the ends with your fingers will give you rounder, fuller petals.

round kanzashi flower totural
You will need the following to make one Kanzashi Flower:
1. Cut and starch your 3 1/2" x 3 1/2" squares. The size you cut your squares will determine how big your flower will be but for this tutorial I will use a 3 1/2" square. You can also make your flower with 5, 6, 7, 8 or even more petals but, for this tutorial I will be using 7 petals.
2. Fold the bottom corner up to meet the opposite corner. Make sure that the wrong sides are folded to the inside so that the right sides will appear on the outside.

3. Now bring the left outside corner and the right outside corner up to meet the top corner as seen below.

4. Flip the fabric over and fold the outside corners into the center as seen in the picture below.

5. Fold in half making sure the folded points you just folded in the previous step are now on the inside.

6. Push a pin through the middle making sure to catch the folded points in the middle as seen in the picture above and below.

7. Repeat this process for the six remaining squares of fabric.

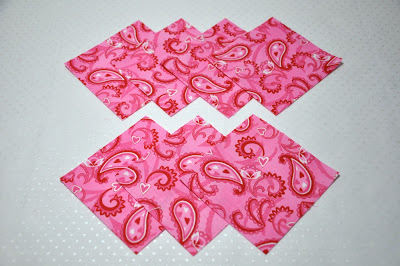
8. Line up the 7 Kanzashi petals.

9. Trim off the triangles at the end of each petal (raw edges) as seen in picture below.

10. String all of the Kanzashi petals on a needle with thread that has been doubled and knotted at the end.

11. Here is a front or top view of what the Kanzashi petals look like threaded together.

12. Here is an underside or bottom view of the Kanzashi petal. Click picture to have a closer look.

13. To finish off your Kanzashi Flower you will sew the petals to each other on the underside of the flower.

14. Now sew the petals together on the top side too.
15. With your iron, give the Kanzashi petals a blast of steam. This will soften the starchiness of the fabric and allow you to play with the petals until you have them just how you want them.

16. Lastly, you will make a covered button for the center of the flower. Just follow the directions on the covered button package. I used a 7/8" covered button.

17. Here's the finished flower.
 Finished Flower Size:
3 1/4" x 3 1/4"
- 7 Squares of fabric measuring 3 1/2" x 3 1/2"
- Starch
- Straight Pins
- Needle and Thread
- 7/8" Covered Button
1. Cut and starch your 3 1/2" x 3 1/2" squares. The size you cut your squares will determine how big your flower will be but for this tutorial I will use a 3 1/2" square. You can also make your flower with 5, 6, 7, 8 or even more petals but, for this tutorial I will be using 7 petals.

2. Fold the bottom corner up to meet the opposite corner. Make sure that the wrong sides are folded to the inside so that the right sides will appear on the outside.

3. Now bring the left outside corner and the right outside corner up to meet the top corner as seen below.

4. Flip the fabric over and fold the outside corners into the center as seen in the picture below.

5. Fold in half making sure the folded points you just folded in the previous step are now on the inside.

6. Push a pin through the middle making sure to catch the folded points in the middle as seen in the picture above and below.

7. Repeat this process for the six remaining squares of fabric.

8. Line up the 7 Kanzashi petals.

9. Trim off the triangles at the end of each petal (raw edges) as seen in picture below.

10. String all of the Kanzashi petals on a needle with thread that has been doubled and knotted at the end.

11. Here is a front or top view of what the Kanzashi petals look like threaded together.

12. Here is an underside or bottom view of the Kanzashi petal. Click picture to have a closer look.

13. To finish off your Kanzashi Flower you will sew the petals to each other on the underside of the flower.

14. Now sew the petals together on the top side too.
15. With your iron, give the Kanzashi petals a blast of steam. This will soften the starchiness of the fabric and allow you to play with the petals until you have them just how you want them.

16. Lastly, you will make a covered button for the center of the flower. Just follow the directions on the covered button package. I used a 7/8" covered button.

17. Here's the finished flower.
 Finished Flower Size:
3 1/4" x 3 1/4"
round end five petal flower

The rounded ribbon edge is made with a washer and woodburning tool. Trace the end of the washer on the ribbon. This will cut the ribbon and seal the end at the same time.


Cut Ribbon to length; these petals are 1 3/4 inches.

Repeat process to make five petals.

Stitch petals together with a needle and upholstery thread.


Pull the threads tight and tie off on the back of flower.


Supplies used in this flower: 1 1/2 inch Ribbon, 1 1/2 inch Metal Washer (hardware store), Woodburner (craft store), Needle and Upholstery thread
FRIDAY, APRIL 3, 2009
Ribbon Flower Tutorial
Fold the ribbon over itself

While holding the angle fold the ribbon back over itself to create the petal end.


Sew each petal together similar to the pattern below.
Pintangle's flower pattern works well and no woodburner required.
The entire tutorial is at http://www.pintangle.com

While holding the angle fold the ribbon back over itself to create the petal end.


Sew each petal together similar to the pattern below.
Pintangle's flower pattern works well and no woodburner required.
The entire tutorial is at http://www.pintangle.com
MONDAY, JANUARY 5, 2009
How to make a 5 Petal Ribbon Flower
Cut Five Lengths of 7/8" Ribbon, all the at 2 1/2 inches long. Heat seal the ends.
Tip: Cut the lengths with a woodburner, which cuts and seals the ends in one step.
Fold the ribbon in half and mark the center edges with a pencil.

There are two ways to make the petal point on flowers, sewing the center points or heat sealing the center points.
Heat Seal Center Points
Bring Center marks together, hold with a pin. Touch the centers with the pointed tip of a wood burner. The wood burner will melt the ribbons together very quickly. Set the wood burner down and hold together for just a second to make sure they seal together.


Place a little bit of hot glue inside the pocket on the back side of the petal. Hold the new melted center to the middle of the petal back. This will hold your angle perfect and enforce the melted center.

Repeat the process on all petals.


Sewing Center Points Place needle through the center edge marks.

Pull tight and tie a couple of square knots.


Attach the center to the back with hot glue or sew it. This keeps the corner or peak the same degree/angle.

Bring the edges together on a petal (make sure the glued edge is on the back so the front will puff up a bit).
Thread a needle with upholstery thread and tie the ends together with a knot.
Sew with a needle using similar stitches on all of the petals.

Continue to sew the remaining petals on the same thread.

Pull the petals to the end, so they stop at the knot.


Thread the needle through the start petals first couple of stiches.

Pull the thread really tight, making sure all the edges stay flat or touching.

Tie the end off on the back side of flower.
Optional: Leave the beginning tail long and tie thread lengths together in a knot when the flower is complete.


Sew a center to the flower. This flower has a piece of scrapbook punched felt under a pink button, sewn with the same upholstery thread as used to make the flower.

Examples of the different lengths of ribbon.

Tip: Cut the lengths with a woodburner, which cuts and seals the ends in one step.
Fold the ribbon in half and mark the center edges with a pencil.
There are two ways to make the petal point on flowers, sewing the center points or heat sealing the center points.
Heat Seal Center Points
Bring Center marks together, hold with a pin. Touch the centers with the pointed tip of a wood burner. The wood burner will melt the ribbons together very quickly. Set the wood burner down and hold together for just a second to make sure they seal together.
Place a little bit of hot glue inside the pocket on the back side of the petal. Hold the new melted center to the middle of the petal back. This will hold your angle perfect and enforce the melted center.
Repeat the process on all petals.
Sewing Center Points Place needle through the center edge marks.
Pull tight and tie a couple of square knots.
Attach the center to the back with hot glue or sew it. This keeps the corner or peak the same degree/angle.
Bring the edges together on a petal (make sure the glued edge is on the back so the front will puff up a bit).
Thread a needle with upholstery thread and tie the ends together with a knot.
Sew with a needle using similar stitches on all of the petals.
Continue to sew the remaining petals on the same thread.
Pull the petals to the end, so they stop at the knot.
Thread the needle through the start petals first couple of stiches.
Pull the thread really tight, making sure all the edges stay flat or touching.
Tie the end off on the back side of flower.
Optional: Leave the beginning tail long and tie thread lengths together in a knot when the flower is complete.
Sew a center to the flower. This flower has a piece of scrapbook punched felt under a pink button, sewn with the same upholstery thread as used to make the flower.
Examples of the different lengths of ribbon.
